Spiced Roasted Halibut with Fennel & Onion

I thought it would be nice to post a fairly quick and easy fancy dish since Valentines' Day is quickly approaching! This meal is sure to get a win from your beau, and it can be made in under an hour! I also have the perfect shortbread cookies EVER coming up in a couple of days.

Spiced Roasted Halibut with Fennel & Onion
Source: Weeknight Fresh + Fast by Kristine Kidd
Serves 2 (can be doubled)

Ingredients
1 1/2 teaspoons ground cumin
1 1/2 teaspoons chili powder
1 teaspoon ground cinnamon
1/4 teaspoon ground turmeric
1 large red onion, halved lengthwise, then cut lengthwise through the root end into 1/2-inch wedges
3 tablespoons olive oil
Coarse kosher salt and freshly ground black pepper
2 Halibut Filets (about 6 oz each) SS: I used a 4 oz filet, and I was still full with the veggies and rice.
Chopped fresh cilantro

Directions

  • Preheat the oven to 450 F (230 C). In a small bowl, combine the cumin, chili powder, cinnamon, and turmeric. Combine the fennel and onion wedges in a 10-by-14-inch metal baking pan. Add 2 tablespoons for the oil to the vegetables and toss to coat. Sprinkle with 1 tablespoon of the spice mixture and toss. Sprinkle with salt and pepper. Spread the vegetables in a single layer. Roast the vegetables until tender and browned, turning once, about 35 minutes.
  • Meanwhile, brush a small baking pan with oil. Brush the fish filets with oil on both sides, sprinkle lightly on both sides with the spice mixture, and salt and pepper. Roast until the fish is almost firm to the touch, 5-8 minutes, depending on the thickness of the filet.
  • Transfer the fish and vegetables to warmed plates, garnish with cilantro, and serve right away.


I served this dish with basmati rice, however couscous or jasmine rice will accompany this dish equally well. I also had a male friend taste-test this one, he gave the dish two thumbs way, way up!

Lunch: Mozzarella, Mushroom & Greens Sandwich

It's so hard figuring out what to pack for lunch as a pescatarian who mostly eats like a vegetarian. I somewhat created this recipe, but I got the idea from a sandwich that I had at a wonderful little restaurant in Wayne, Pa called Gryphon Cafe. Although the sandwich requires you to saute some mushrooms, it is actually best served cold, which is perfect considering that this is a lunch dish!

Mozzarella, Mushroom & Green Sandwich
Serves 1

Ingredients
2 slices good bread *I opted for a ciabatta or tuscan bread, something soft with a nice crust
2 slices fresh mozzarella *I strongly encourage you to buy fresh mozzarella! The shredded stuff won't have the same flavor. It comes packaged in plastic, and is sold by weight.
Salad of your choice *Arugula adds wonderful bite, definitely go with a green leaf
Balsamic Vinaigrette
Dijon Mustard
Portebella Mushrooms, sliced *I used one big bella!
Tomatoes, sliced (for those who like them)
EVOO

Directions
  1. The day ahead, saute the mushrooms in EVOO over medium heat. Put aside in the fridge to cool overnight.
  2. To make the sandwich, spread the mustard on both slices of the bread. Next, layer with mozzarella, and mushrooms, then the salad, drizzle the balsamic vinaigrette over the salad - about 1 teaspoon. Top off the sandwich with the second slice of bread!
I ate this sandwich with roasted almonds, or with this leftover pasta. Quick & delish! Happy Friday everyone!

Heat Styling on My Own

This past weekend, I straightened my hair. This was the first time I heat-styled my hair myself. The process was long and tedious, however I was more confident in my styling abilities after watching plenty of other kinky naturals do this. KKQ, in particular was my recent motivation for this style. She has gorgeous kinks and opts to straighten her hair herself on occasion. My method for straightening followed my typical wash routine with some additions.
  1. Pre-treat scalp with Jane Carter Solution Scalp Renew - to combat my dry scalp.
  2. Pre-poo/deep condition hair with Aubrey Organics Honeysuckle Rose Moisturizing Conditioner, sit for 15 minutes.
  3. Wash hair with Desert Essence Organics Lemon Tea Tree Shampoo. It's a new one I'm trying because Loo likes it.
  4. Condition and detangle, with wide-tooth comb and Denman. I keep forgetting to buy conditioner, so I just used some old conditioner I had by Nature's Gate.
  5. Section hair in to 10 sections and twisted each section.
  6. Spray each section with Aveda Brilliant Damage Control as a heat protectant.
  7. Blow-dry each section with Hot Tools blow dryer using comb-attachment on High Heat. It's not a super-powerful blow-dryer, so I'm sure high heat is still within the "safe" range.
  8. Apply quarter-size amount of Grapeseed Oil to blow-dried hair.
  9. Flat-iron hair in small sections with FHI Flat Iron on 300 F. Click here if you want to know why I chose 300 F.
  10. Snip split ends with shears. (I cut about 1/4" - 1/2" in some places)
  11. Twist each section of hair and bantu knot it. That's how I got the curls that you saw in this post.
*All products were purchased by me at Whole Foods with the exception of the Aveda product that I purchased from an Aveda store. The entire process took me about 4 hours. I straightened my hair on Friday (1/21), and I have worn a series of french braids and buns for the past week. Here are some pictures of my hair "out" from Wednesday


My hair has reverted some, but I don't care - I like the texture, and I normally have it all pinned up. To end this post, I will share my personal feelings on heat styling and being natural, because I know it's a touchy topic in the natural hair community.

My personal opinion on heat styling natural hair:
Heat styling is not the devil, and it does not have to ruin your kinks. I was natural for 14 years before I got my first relaxer. I would get my hair straightened quarterly as a young girl, and monthly as a pre-teen. I never experienced heat damage then. There are "safe" temperatures to heat style natural hair, and as long as those temperatures are used, hair should not suffer from heat damage. Check out Jc's post here covering "How Hot is Too Hot"? I used that post as a guide for the temperature setting on the flat iron.

In saying all of the above, I do know there is a lot of added strain that accompanies heat styling - that's a lot of pulling on my tresses!!! Thus, while I do think heat styling is a lovely change, I will use this technique in moderation, and I will administer all heat styling myself. This was the most gentle experience my hair has ever had with heat, and since length is still a goal, I think it's wise to leave the heat styling to me during cool-weather months.

To see previous straight hair looks, check out the links below:
July 2010 Straight Hair
September 2009 Straight Hair

Linguine with Spinach and Peas

I've been on a quick dinner cooking run for the past couple of weeks. I even have a couple of fancy dishes up my sleeves that can still be made in under one hour. This is a great dish for anyone on the go. It's tasty, affordable and very quick and easy. Don't let the multiple steps fool you, I whipped this dish up in less than 20 minutes! This can easily be served with grilled chicken or lean beef for the meat lovers.

Linguine with Spinach and Peas from Get Cooking by Mollie Katzen
Serves 4

Ingredients
Salt for the pasta water
About 1/2 bag (about 5 ounces) fresh baby spinach leaves
5 tablespoons olive oil
2 teaspoons minced garlic (2 good-sized cloves)
1/2 teaspoon salt
1/8 teaspoon red pepper flakes
3/4 pound linguine *I used 1 pound
2/3 cup grated Parmesan cheese
1 10-oz package frozen peas, defrosted and at room temperature
1/2 cup pine nuts (optional)

Directions
  1. Put a large pot of cold water to boil over high heat, and add a tablespoon of salt. Place a large colander in the sink.
  2. While the water is coming to a boil, tear the spinach into large bite-sized pieces (this pretty much means just tearing the leaves in half, since they're already small) and drop them into a large bowl. Pour the olive oil over the spinach, then sprinkle int he garlic, salt, and red pepper flakes. Use tongs or a long-handled fork to mix, and set aside.
  3. When the water boils, add the linguine, keeping the heat high. Cook for the amount of time recommended on the package, tasting the past toward the end of the suggested time to be sure it is not getting overcooked. When the linguine is just tender enough to bite into comfortably but not yet mushy, dump the water-plus pasta into the colander. Shake to mostly drain (it's ok to leave some water clinging). Then transfer the past to the bowl containing the spinach mixture, mixing it in with the tongs or the fork until all the past is coated with olive oil. The spinach will wilt on contact with the hot pasta.
  4. Immediately sprinkle in the Parmesan and toss well, so the cheese gets evenly distributed and melts nicely. Add the peas, and nuts mixing them in very gently so you don't break them.
  5. Serve hot, warm or at room temperatures, passing extra Parmesan and red pepper flakes for people to add at the table.

Nueva York Part 2


Top - J. Crew; Skirt - Anthro; Tights - Hue; Shoes - Steve Madden; Earrings - Anthro; Lips - MAC, Satin


Date: Saturday, January 22, 2010

Welcome to part 2 of my trip to Nueva York! So, it's still the same day, but it's night time now. Lindsay and I had a brief photo shoot before and after the party. We're vain and we are not ashamed - jk!!! The original "event" that brought me to NY was a former co-worker/friend's birthday party, and since my bestie lives there now, I have NO EXCUSE to not go to NY.


Linds accompanied me to the bday dinner. We ate Spanish tapas at Macondo in The Village. We took the A to the F, and had very little outdoor walking to do. I love New York's subway system, it's amazing! I was able to wear my heels, throughout the night, and I didn't fall! Sorry that the shoes aren't pictured, but I've worn them a ton of times - they were in my 30 for 30. Overall, it was great to get out of the house, and re-connect with friends. I had a blast!


One comment I will make regarding party dinners as a fairly new pescatarian is this: It's hard to eat at dinner parties as a pescatarian when everyone is sharing plates. *Lindsay is also a pescatarian, AND she has a nut allergy, so it's even tougher for her.* She actually could eat about 3 of the 10 offered plates, while I ate 5 of the 10 offered plates. In the end, the bill is still split evenly, when you only ate half of the options. :( In the future, I think I will just order a separate dish in the beginning that I know I can and will eat, and be full. That is all.

Nueva York Part 1


 Top - Urban; Blazer - Banana; Tights - Hue; Boots - Second hand, Urban; Necklace - Etsy; Earrings - Mango; Lips - MAC, Satin

Date: Saturday, January 22, 2011

I had a wonderful weekend in NY. I arrived around 6 pm on Saturday via the Bolt Bus, and left at 8:30 the next morning. I still had work to do this weekend, so it was more of a "drive-by trip." Nevertheless, I had a wonderful time!!! This outfit shows my "commuter look", part 2 will show what I wore later in the evening. Once I arrived, I hung out with my friend Lindsay, and hung out with her friends in Washington Heights. Most of the time was spent on the subway since it's quite a trek from Washington Heights to the village, however I got to catch up with my bestie, which was AWESOME!!!

PS - Do you notice something different about my hair? It's straight!!! Temporarily of course. I washed, conditioned and styled it MYSELF on Friday. I'll have a separate post with all of the fun details later in the week.

Short(er) Hair Styles

I realized this: lots of snow means no outfit pics, which means my "blog life" is difficult because I have to get creative with my posts ;-). Yesterday, while contemplating locking my hair looking through some old pictures, I came across these lovelies from June/July 2009 that never* made it to the blog. *Pic number 1 did make an appearance, but I'd bet money that most of you hadn't seen it!


Both the headband and clips are from Anthro. Although the headband is gone, Anthro always has some funky clips and other accessories for hair.

I think both styles are super cute and sassy. I was a devoted two-strand twister when I first combed out my locs. This was the only style I knew. I always created my twists on wet hair, so shrinkage was maximized. This reminds me what hair accessories can do for a style. Just thought I'd post this for those out there who might have shorter hair.

Here's to a wonderful weekend. I'm excited about it, I'm visiting several friends in NY. AND...I WILL take some pics while I'm there! I already have my outfit planned and it's going to be HOT, I didn't even feel the need to shop to put a nice look together! I also may have some hair surprises in the pics...either way - check for pics on Monday!!!

Cuban Black Bean Soup...yeh another one

Yes, another food post, I've really been a little cooking monster recently. Remember this black bean soup I discussed last week? Well, it's not a good every week lunch soup, because it takes too long to fix. However, this soup right here...well - it's a winner. Simple ingredients, simple recipe, great taste. This soup took me about 1 hour to prep and cook - perfect lunch while working from home. Enjoy!

Black Bean Soup from Get Cooking by Mollie Katzen
Makes 4-5 servings

Ingredients
2 tablespoons olive oil
1 medium red or yellow onion, minced
2 1/2 teaspoons ground cumin
Half a medium red bell pepper, minced
1 tablespoon minced or crushed garlic (about 3 good-sized cloves)
1 1/2 taspoons salt
3 15-ounce cans black beans
3 cups water
1 to 2 tablespoons fresh lime juice
A big handful of cilantro *I omitted
Freshly ground black pepper
Red pepper flakes

Directions
  1. Place a soup pot or a Dutch oven over medium heat. After about a minute, add the olive oil and swirl to coat the pan. Add the onion and cumin, and cook, stirring occasionally, for about 5 minutes, or until the onion softens.
  2. Add the bell pepper, garlic, and salt, and reduce the heat to medium-low. Cook, stirring occasionally, for about 15 minutes, or until the vegetables  are very soft.
  3. Meanwhile, set a colander in the sink and pour in the beans; give them a quick rinse and allow them to drain.
  4. Add the beans and the water to the soup pot, and bring to a boil. Then turn the heat all the way down to the lowest possible setting, partially cover, and simmer gently, stirring occasionally, for 15 minutes.
  5. Use a potato masher or the back of a slotted spoon to mash about half of the soup so it thickens. The soup will become somewhat chunky, not completely smooth. (You can also puree it, if you like, with a blender or immersion blender.) If at any point it seems to have gotten too thick, it's okay to add a little extra water (about 1/4 cup at a time) until it's a consistency you like.
  6. Add a tablespoon of the lime juice, and then taste to see if you think it needs the second tablespoon. Use scissor to snip in the cilantro (it's okay if the pieces are a bit rough). Add about 8 grinds of black pepper and a pinch of red pepper flakes, and then simmer and stir for another minute or two to let the flavors blend. Serve hot, with lime wedges on the side.
I omitted the lime wedges, because I'm not big on garnish when it's just me, and I don't like cilantro, so I left it out. PS - I'm realizing that perhaps mushy soups don't look appetizing in pictures...

White Elephant Hair: Bantu-Knot Out Updo

Ok guys, my previous experience with Bantu-Knots was an inexplicable FAILURE! After one year of healing, I decided to give them a try after I saw a wonderful tutorial from Naptural85 to get the look you saw in this post.  I followed her tutorial to-a-tee, then I used a headband to pull some hair back and pinned the back up with hair pins. Here are some pics from this style on my hair.


Here's the video/tutorial - hopefully you too love the final look!


Know that I loved this look, however the downside, was that it only lasted one day for me. SMH. I think that curly/twist-out/braid-out/bantu-knot out styles must last longer for people with more of a curl pattern because the actual style is closer to their texture. I think this has been the main reason for my hair frustration - after one day, all of my "out" styles look like an afro. I love my afro, but when I'm going for a twist-out look, I don't want an afro! Additionally, I feel that those out styles are easier to maintain than my afro, which leads to less knots and tangles. Ok, just had to vent a little. If any of you try this style, let me know how well it holds up for you. Naptural85 wore this style for 3 - 4 days before she re-did it.

Click here to see the original video link.
Click here to visit Naptural85's youTube channel.

Salmon Burgers with Crispy Cucumbers and Spicy Mustard

Today was a wet and dreary day. Yesterday evening, it snowed and the wind blew for days. This morning, I woke up to ICE RAIN!!! I had to scrape the ice off of my car in the freezing ice rain. Needless to say, I didn't take an outfit picture today. So, today I present you with a nice burger of the pescatarian type. Let me also add that the Whole Foods Brand of Wild Alaskan Salmon sells for $2.29 for a 15 oz. can. So don't think this dish came with a hefty price tag, because it did not!!!

Salmon Burgers with Crispy Cucumbers and Spicy Mustard from Get Cooking
Makes 4 burgers

Ingredients
Two 7.5 oz cans salmon
1/2 cup toasted breadcrumbs *see below for my homemade recipe
2 large eggs
3 tablespoons very finely minced red or yellow onion
1/4 teaspoon salt
1/4 teaspoon freshly ground black pepper
1 to 2 tablespoons olive oil
Lemon wedges (I didn't use them)

Directions

  1. Open each can of salmon and use the lid to press the salmon down in the can as you tilt it over the sink until most of the liquid has drained out. Put the salmon in a medium-large bowl. Using a fork or your clean fingers, flake the salmon into small pieces. Add the breadcrumbs, eggs, onion, salt, and pepper, and mix until thoroughly combined.
  2. Divide the mixture into 4 equal portions and shape them into patties, each a generous 1/2-inch thick.
  3. Place a large (10 to 12 inch) heavy skillet over medium heat. After about minute, add 1 tablespoon of the olive oil and swirl to coat the pan. Place the salmon patties in the pan and cook, undisturbed, for 3 to 4 minutes, or until golden brown on the bottom.
  4. Use a metal spatula to carefully loosen each burger flip it over, adding more oil if the pan seems dry. Cook on the second side for 3 minutes, or until the undersides are nicely browned. Serve each burger with a wedge of lemon.
Breadcrumbs

  1. Take the heel of your favorite bread and toast it so that it is extra crispy, but not black. 
  2. Crumble the bread in a bowl.
  3. Toss it in a pan over medium-heat with a drizzle of olive oil with a couple turns of fresh pepper.
I topped the burger with spicy mustard, crisp sliced cucumbers and served it on toasted oatmeal bread. I served it with a side salad. Loved this meal.

Two Points


Sweater - Nordstrom ??? (c. 2004); Tank - Urban; Skirt - Anthro (borrowed); Boots - Cavenders; Earrings - Frank & Myrrh; Watch - Fossil (gift)

Date: Sunday, January 16, 2011


  1. Sunday was a day of errands. I like to be comfortable when I run errands. What's not more comfy and warm than a long maxi dress with a knit sweater and my handy cowgirl boots? I was preparing for today (MLK Day, 1/17/11) because I led the service event for my sorority chapter this year. We went out to a senior citizens home and sang songs, did some MLK trivia and talked with the residents. It was AWESOME!!!
  2. Not to totally switch subjects, but I must say this about maxi dresses/skirts in the winter. I usually love the idea of them, but find them hard to pull off myself. I take my hints of how to wear these items in the winter from Jessica. She's done a marvelous job with it time and time again. I feel like she is effortlessly chic too...thus, I want to be like her in this way. The end.

1-Year Length Comparison & Check

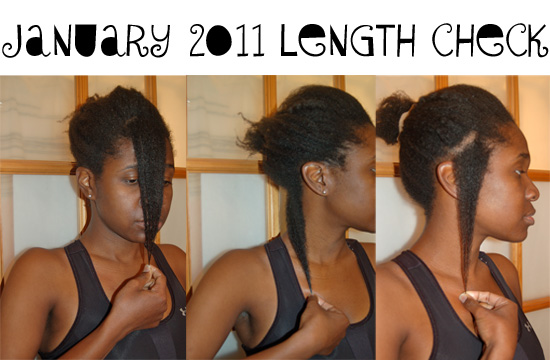
Ladies & Gents it's that time of the year AGAIN! Yes, it's time for my bi-annual length check. I kind of cheated last time and did a quarterly check in. This is the first time that I can display a full year's worth of growth. No need to talk about my progress - just check the pics! PS - Let me apologize for the lack of photo quality displayed on my earlier pics taken with...ahem...the camera on my phone.


Honestly, I haven't seen a lot of change in the front section from the quarterly check-in. However, overall, I definitely feel like I've gained 4 inches in the back and a solid 6 inches in the front from 2010 to 2011. When I got my hair straightened in July, the stylist cut at least 2 inches in the back, so I think that's why my hair appears to not have grown as much in the back. Overall, I'm very satisfied. I'm looking forward to my next check in, I'm going to definitely wear the same thing, use my nice camera, and take shots from these three angles moving forward.

One more thing. Did you notice that the pictures are all together in one nice photo this time? Well, if you didn't that's ok. I am super excited to announce that I GOT ADOBE PHOTOSHOP!!! That's how I put the pictures together. I have been using iPhoto and Seashore to edit my photos, but iPhoto is limited, and Seashore, although free, is not user-friendly. I'm looking forward to creating things with the new software!

This post is already lengthy, so look for a hair goals post in the near future. Check here for my last length check posts.

January 2010 Length Check
July 2010 Length Check

TAG...7 things from the Wonder Years

So...I've been really lazy this week, and I haven't taken ANY pictures. We got 4" of snow yesterday and the wind is ferocious. I don't feel like shoveling my car out, nor do I feel like posing. So here you have it, a 7 Things TAG post AKA a wonderful excuse to generate a post without any [real] work. HA!

Kendi and Elaine recently posted some pretty cool stories, and although we're not friends, I thought it would be nice to pretend we are and post some stories and pics from...The Wonder Years!

Pic of me at age 3 and lovely 16.

Grandma, DJ and me he's a newborn so I'm 12 in this pic, and it was probably bedtime, hence the scarf.

  1. My first kiss was in the second grade on the school bus by a boy named Michael Shackelford. Most other kids made fun of him because kids are mean, but I liked him. My best friend, Riayn, made me kiss him that day - she was very aggressive. He bought me chocolates for Valentines' Day and a card. PS - it was on the cheek.
  2. I was one of those kids who lost both of their front teeth at the same time, and then lost the ones next door at the same time. So I was either buck-tooth or toothless. My cousins (from this post) teased me about it.
  3. I've played basketball since the fourth grade. Back in the 90s, there weren't many female leagues just for girls, so I played in a lot of coed leagues. My dad wished I was a boy, and trained me to be very tough. Long story short, in one game, I passed the ball to a boy on my team, and made him cry.
  4. In real life, I'm a talker, and I've always been that way. When I was younger, my family would joke with me that if someone ever kidnapped me, they'd return me as soon as I opened my mouth.
  5. Even though I was a tomboy in high school, I was in a debutante cotillion in 11th grade.
  6. In high school, I participated in a couple of school plays in which I had the role of Grandma Tzeitel in Fiddler on the Roof, and Titania in Dream on Royal Street.
  7. My go-to shoes in HS: Addidas slip-ons with socks. I'd wear them throughout the fall and winter!
Bonus pic of me and my "hubby" from Dream on Royal Street (12th grade). PS - I was wearing a wig.

Anyone else who wants to join in on the fun and reveal some fun stories, please do. For now, I'm going to tag Libby, Marie and Jc!

Pad Thai

Last week I made this Pad Thai and it was AMAZING!!! I had some bean sprouts at home, but they were moldy, so I had to leave them out. Additionally, I'm not a fan of cilantro, so I left that out too. Regardless, this is a great quick weekday meal!

Pad Thai from the Whole Foods Cookbook

Ingredients
1/2 pound flat rice noodles or mung bean noodles
1/2 cup canola oil
3 cloves garlic, minced (1.5 teaspoons)
2 teaspoons red chili paste
1 teaspoon sugar
3 tablespoons Thai fish sauce
1/2 cup water
2 large eggs, beaten
1/4 cup thinly sliced scallions *I used about 2
1/2 cup snow peas, strings removed and finely julienned
1 1/2 cups fresh bean sprouts
1/4 teaspoon crushed red chili flakes
1 tablespoon lime juice
3 tablespoons chopped fresh cilantro
1/4 cup finely chopped dry roasted peanuts


Directions
Bring a large pot of water to a boil, add the noodles, and cook just until the water returns to a boil. Remove the noodles immediately, and drain them. Rinse in ice-cold water to stop the noodles from cooking further. Heat the canola oil in a wok or large saute pan. Add the garlic, chili paste, sugar, fish sauce, and water. Cook for 1 to 2 minutes, until slightly thickened. Add the beaten eggs, stirring constantly, until the eggs are soft set. Add the noodles to the pan with the chili paste mixture, toss, and saute for 3 to l4 minutes over medium-high heat. Add the scallions, snow peas, bean sprouts, red chili flakes, and lime juice. Toss to mix well and heat through, about 1 minute. Place on a serving platter, and sprinkle with the cilantro and peanuts.

Lasagna with Two Sauces

Over the Christmas break, I made this lasagna to guarantee I had substantial food to eat over the holidays. I think the second (Alfredo) sauce replaced what ricotta normally does in lasagna. I forgot to take "official plated" pictures due to extreme hunger, but trust me when I say - this was some good lasagna!!! Warning - this is not for the faint at heart, total prep/cooking time was 3+ hours. This obviously is a holiday/party dish that I wouldn't cook on a regular week day. I plan to post another food dish tomorrow that's much more reasonable...and it's thai-inspired!!!

Lasagna with Two Sauces from the Top Chef Cookbook
Serves 8-10


Ingredients
ALFREDO SAUCE
2 teaspoons EVOO
3 roasted garlic cloves (click here for instructions on how to roast garlic)
1 quart heavy cream
1/2 teaspoon freshly grated nutmeg
1 teaspoon dried basil
1 teaspoon dried oregano
1/2 cup finely grated Parmesan cheese
1/4 cup finely grated Romano cheese
Salt and freshly ground black pepper

FIRE-ROASTED MARINARA SAUCE
3 tablespoons EVOO
6 roasted garlic gloves
2 medium carrots, finely diced
1 medium white onion, finely diced
2 celery ribs, finely diced
1 shallot, finely diced
1 tablespoon fresh thyme leaves
1 small bunch basil, cut into chiffonade
1/2 cup sherry
1/2 cup brandy
2 28-oz cans whole fire-roasted tomatoes with juices
3 plum tomatoes, peeled, seeded, and diced (click here for instructions on how to peel tomatoes)
2 cups low-sodium vegetable stock
1 tablespoon sugar
Slat and freshly ground black pepper

LAYERING INGREDIENTS
1 pound dried lasagna noodles, cooked al dente (I used the pre-cooked ones)
8 ounces mozzarella cheese, coarsely grated
8 ounces provolone cheese, coarsely grated
1 cup finely grated Parmesan cheese
1/2 cup finely grated Romano cheese
Freshly ground black pepper

Directions
FOR THE ALFREDO SAUCE:

  1. In a large saucepan, heat the oil over medium heat. Add the garlic and cook for 2 minutes, breaking it apart with the back of a wooden spoon. Add the cream and bring to a simmer (do not boil). Add the nutmeg, basil, and oregano and cook until reduced by about half, about 45 minutes, watching the pot carefully so the cream doesn't boil over.
  2. Lower the heat, add the grated cheese, and stir until incorporated. Season with salt and pepper to taste. Set aside.


FOR THE FIRE-ROASTED MARINARA SAUCE:

  1. While you're making the Alfredo sauce, in a large saucepan, heat the oil over medium heat. Add the garlic and cook for 2 minutes, breaking it apart with the back of a wooden spoon. Add the carrots, onion, celery, and shallot and cook until the vegetables are caramelized, about 20 minutes. Add the thyme and basil and cook for 1 minute, stirring.
  2. Add the sherry and brandy and cook for 5 minutes, scraping any browned bits from the bottom of the pan. Add the canned and fresh tomatoes, the stock, sugar, and salt and pepper to taste. Bring to a simmer, then reduce the heat and cook for 1 hour, stirring occasionally, to thicken and concentrate the flavors.
  3. Using an immersion blender, blend the sauce directly in the pot. Taste and adjust the seasonings, adding salt and pepper to taste as needed. Cook for an additional 15 minutes, stirring occasionally, then taste again and adjust the seasonings if needed.


FOR LAYERING INGREDIENTS:

  1. Preheat the oven to 350 F.
  2. Spread a thin layer of marinara sauce over the bottom of a 13x9 inch baking pan or lasagna pan. Follow with a layer of lasagna noodles, overlapping the noodles slightly. Spread a layer of Alfredo sauce over the noodles and top with a layer of marinara sauce. Sprinkle with some of the mozzarella, provolone, Parmesan, and Romano cheese, followed by a dusting of pepper.
  3. Repeat the layers, reserving some of the marinara sauce and some of the Parmesan and Romano cheeses to cover the final layer of pasta.
  4. Cover loosely with aluminum foil and bake for 50 minutes, or until starting to bubble, then remove the foil and bake for another 15 to 20 minutes, or until heated through and bubbly on top. Remove from the oven and let stand for 10 minutes before serving.

Oh yeh...I'm an engineer


Top - Urban (hand me down); Cardigan - Banana; Pants - Anthro; Shoes - Boutique 9 via Anthro; Earrings - Franklin Square


Date: Thursday, January 6, 2011

Do you guys know what I do for my day job? Some of you may know, but for those of you who don't know - I'm an engineer. Let me tell you why that's relevant to this outfit, and a new resolution I've made for 2011 and beyond.

As an engineer, I visit industrial sites such as power plants and refineries in my day job. The nature of the work I do restricts what I can and cannot wear. In the past, I have given ZERO thought into my clothing when I go to my site visits (3 times a week). I end up looking CRAZY, I typically wear a company-logo-laden polo, khakis and UGGs in the winter, or Sperry's in the summer. This type of wardrobe could probably land me on my favorite show of all time, What Not to Wear. Some of the recent makeovers have featured women in non-traditional jobs. Stacey and Clinton have managed to maintain style, and still make the outfits work-appropriate for those women. I hope to do the same for me and my day job! Let me start off by explaining some of the limitations that accompany working at an industrial site.
  1. You should not wear anything dry clean only
  2. You cannot wear dresses or skirts
  3. You must wear steel-toe boots
  4. You must wear Personal Protective Equipment (PPE) - PPE consists of a hard hat, safety glasses, and ear protection in some plant areas
  5. Earrings cannot be larger than a quarter 
  6. Clothing must be breathable and comfortable*
  7. Clothing must be bending-appropriate - longer tops and belts are necessary*
These rules may vary by site, but in general, they will allow you to be appropriate at most industrial sites. I added the last two rules in because some activities that I perform are labor intensive.

You can probably start to see why I threw in the towel and said that I will not look cute at my day job, I thought, "It's not possible." BUT IT IS POSSIBLE! My new resolution is going to be to maintain my personal style, and to make it engineer-work appropriate.

I have discussed this dilemma with a lot of my engineering female friends. I do think it's a challenge, but it's one that I'm up for in 2011! So this is for all of my ladies in non-traditional jobs. For those of us who get our hands dirty, who sweat, and occasionally spill things on ourselves - this is for all of you. Let's be the beautiful women we are! Although we may work in male-dominated fields, we are still women, and our clothing can reflect that in an appropriate way. Moving forward, I'll add an "Engineer Approved" label to any outfits that I wore on site visits.

The rebirth of an outfit


Dress - ?? (hand me down); Blazer - J. Crew (hand me down); Tights - Anthro; Shoes - Anthro; Necklace - ??? (hand me down); Earrings - Urban; Watch - Gift (Fossil)

Date: Wednesday, January 5, 2011

Have you ever had a piece in your closet that you wore CONSTANTLY one season, and because of that, you don't wear it the following season? That's the story of this dress. I think I wore it the same way, once a week in 2008 and 2009, and I didn't wear it in 2010. I knew I wanted to wear something comfy and girly, and this dress was the perfect option. However, I wanted to make it new, so I asked myself, how will I do it?

I normally paired the dress with a coral-cardigan, brown tights and camel boots. This time, I went for the blazer because there are some brown tones in the dress. Then I thought, I can't wear boots, it will just ruin the girly look. So I thought, wouldn't it be great if I can wear it with my fave Anthro heels? Then I thought, but I'm mixing patterns, and the only way to link these two together is with tights that are a shared color in the dress and the shoes. Brown tights? Negative - lost them last year. Purple tights? Affirmative! And so this outfit was reborn!!! This is one of my favorite looks that I've put together thus far.

Black Bean Soup

I'm still struggling finding a nice, easy pescatarian-friendly lunch option. Right now, I'm feeling soups - but only easy soups. I LOVE this one black bean soup that Whole Foods makes. It's just so flavorful and super nutritious!

I made this black soup when I was home last week - my mom liked it, and I think my brother did too. I will say that I subbed fake veggie bacon - "facon, pronounced fay-ken" - for real bacon and I realized: There is nothing like real bacon. Just like turkey bacon never lives up to pork bacon, facon is just a poor excuse for flattened soy that's been colored reddish-brown. I say that to say, if any meat-lovers subbed the facon for real bacon, I bet this soup would REALLY be off the chain! Ok, enough talking - on to the food!

Black Bean Soup from www.foodnetwork.com
Serves 4-6
Click here to access the original recipe

Ingredients
10 slices bacon, finely chopped *subbed with facon by Light Life
2 medium onions, chopped (about 2.5 cups)
6 garlic cloves, pressed
1 14.5 oz can reduced-sodium chicken broth* subbed with veggie broth
1.5 cups canned chopped tomatoes
2 tablespoons ketchup
2 teaspoons Worcestershire sauce
1 tablespoon chili powder
4 15.5 oz cans black beans, drained but not rinsed
Kosher salt and freshly ground black pepper
1 bunch cilantro
Juice of 1/2 lime
Scallions, sliced, for garnish
Sour cream, for garnish
Grated cheddar cheese, for garnish

*One last note about the facon, my mom did say she liked it, along with another friend who was over for breakfast the next day. Thus, some people may like it but I didn't.

Directions
Put the bacon into a large heavy pot and place it over medium heat. Cook until it starts to give up its fat, about 4 minutes. Stir in the onions and cook, stirring, until they start to turn translucent, about 4 minutes. Stir in the garlic and cook until you can smell it, about 1 minute. Add the broth, tomatoes, ketchup, Worcestershire, and chili powder. Stir in the beans, turn the heat to high and bring to a boil. Adjust the heat so the soup is bubbling gently and cook 10 minutes. Season with salt and pepper.

Meanwhile, pick off all the thick stems from the cilantro. Wash it and shake dry. Chop the cilantro coarsely and stir it into the soup when it has been simmering 10 minutes. cook until the soup is thickened, about 5 minutes. Stir in the lime juice. Serve with the garnishes.

New Years' Post...Finally


Top - Free People; Shorts - Anthro; Jacket - Borrowed from mom circa 1980s; Tights - Hue; Shoes - Boutique 9 via Anthro; Earrings - Anthro

Date: Friday, December 31, 2010

Oooh...I'm so trife for posting this on January 4, 2011. LOL, oh well, I really did wear this outfit, and I loved it! My New Years' was spent with family. We went over to my dad's frat brother's house and had chicken and waffles with some of their friends. We toasted to 2011, and I was asleep by 1 am. I'm not much of a partier, so this was a great New Years' for me!

To loc or not to loc?

Hey Everyone,

Happy New Year!!!

I meant to get an outfit post up today, but I just couldn't get around to it. I know this is a fairly "weak" post but I decided to pose a question that has been boggling my mind for the past couple of days. The question is:

Should I loc my hair?

I've been contemplating this because I have recently become tired of my doing my hair, and I also find myself disliking the majority of styles that I end up with. I think some of this is normal, in terms of being tired of your hair. However, there's one last thing I desire: EASY hair. I know my natural hair in free-strand form is WORK! However, I remember starting my locs two years ago, and comparatively speaking - it was easy! In fact, it really wasn't a lot of maintenance, and I would still have a lot of freedom in terms of styling.

Ok, you have heard my case, but I haven't made a final decision yet. I definitely want some input. What do you guys think? Should I loc my hair?